Adding New Users
After an extension has been added into the bvoip phone system, they will need to have their desired 1stream license added to the extension as shown in the 1stream User License Tool article. Once the license is assigned in the bvoip phone system, the following will be needed to be done to add the users from the phone system:
- If this warning icon appears underneath the extension number, click it.

- The icon will turn the other warning icons grey, indicating the change taking place. It will then refresh the screen and show the 1stream icon.

- The user will be added into 1stream at that time.
- The icon will turn the other warning icons grey, indicating the change taking place. It will then refresh the screen and show the 1stream icon.
- Log into the 1Stream Admin Portal.
- Go to the Administration > Manage Organization menu in the top right.

- Scroll Down to the CRM User Mappings section.
- Go to the Phone Extension column.
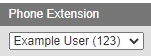
- In the drop-down, match the desired extension to the 1stream user.
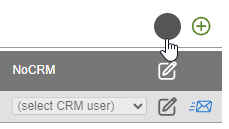
- If you have connected CRMs, ensure they are set in each CRM's named column using the circles that appear in the top right.
This process will need to be repeated as needed for each additional user.
User Licensing Count and Type Change
If you receive a notice that you have run out of user licenses when adding a user or wish to change plan types on a user, please reach out to your bvoip sales representative to have user licenses added or plans changed.
Edit A User Menu
By clicking on a user's name, you enter a more detailed view of their user which allows you to set the additional options below
- First and Last Name: Should likely match the phone system
- Phone: This is the mobile number for sending SMS notifications, like used in the Signal system.
- Email: This is the email used for sending email notifications.
- Status: If you want to block a user from 1stream temporarily, you can move them to Inactive.
- HubSpot Booking URL: If you use HubSpot, this is where you can put your booking URL for each user.
- Bring Client to Front: Should 1stream be brought to the front when a call comes in? Only works with the 1stream Legacy Desktop Application.
- Screen Pop New Calls: Should new calls create a Screen Pop (new window/tab) in the primary CRM that points at the caller?
- Screep Pop on Ringing/Answered: If the above option is turned on, this determines whether the popup happens when the call is presented or once it is accepted by the agent.
- User Type: This is the deprecated 1stream User Types which should not be necessary anymore.
- Selected Plan: This is the plan the user is using, see 1stream User License Tool for how to change that properly.
- Enable Call Back Feature: When turned on this enables the User Callback Tool for that extension.
- Selected Permission Group: What 1stream User Permission Group should this user be using? This controls their permissions to 1stream.
- Include in Dial By Name: Should this user be part of the Enhanced Dial-By-Name Directory?
- New Call Search Option: This option allows for a user to be prompted to search for a client or have automation for the caller's contact to be searched for when a new call happens.
- SMS Receive Email on New: This is a setting that works specifically with the 1Stream integrated SMS on if this user should be able receive emails when new SMS messages are received.
- Messaging Only View: This is a setting that works specifically with the 1Stream integrated SMS on how messages should be viewed for this user.
- Clear Custom Status: This small link allows you to clear the users Custom Status in case it is stuck for any reason.
Adjusting User Accesses
If you are needing to adjust a user to be an Admin in 1stream so that they can use the Admin Portal, please refer to our 1stream User Permission Groups article for more details.
Deleting and Re-adding Inactive Users
If you need to delete a user, remove them from the phone system and they will be automatically inactivated in 1stream.