Warnings
Poly Unsupported Process
This is an UNSUPPORTED process. HP Poly does not support the conversion of devices between the two versions, there just happens to be a way to do so.
Damage may occur
bvoip does not take responsibility for the contents of this article, and by following it you acknowledge the risk that the device may become inoperable. We have successfully used this process in practice, however unaccounted variables may occur.
bvoip Unsupported Process
As the manufacturer does not support this, bvoip does not either. We are simply making this information available to you, and we cannot really help past what is listed here.
Flash the Firmware
- Power on the OBi Edition phone and ensure it's connected to the network
- Find the IP address of the phone in either of the following paths depending on the version:
- Main Menu > Settings > Network
- Main Menu > Product Info > IP Address
- Use the found IP address to access the web page of the device
- Login to the phone, the default credentials:
- Username: admin
- Password: admin
- On the homepage of the device determine the firmware version, and pick a firmware URL below based on that
- You should visit the link below to ensure it is still working. If not, you'll need to find a sip.ld file and host it on a FTP/HTTP server that the device can access.
-
v6.3.0 or lower
- VVX 150: http://downloads.polycom.com/voice/software/UC_Software_6_4_5_release_sig_split/3111-48810-001.sip.ld
- VVX 250: http://downloads.polycom.com/voice/software/UC_Software_6_4_5_release_sig_split/3111-48820-001.sip.ld
- VVX 350: http://downloads.polycom.com/voice/software/UC_Software_6_4_5_release_sig_split/3111-48830-001.sip.ld
- VVX 450: http://downloads.polycom.com/voice/software/UC_Software_6_4_5_release_sig_split/3111-48840-001.sip.ld
-
v6.3.1 or higher
- VVX 150: http://downloads.polycom.com/voice/software/UC_Software_6_4_5_release_sig_split/3111-48810-001.sip.ld,bgu-conv=disable
- VVX 250: http://downloads.polycom.com/voice/software/UC_Software_6_4_5_release_sig_split/3111-48820-001.sip.ld,bgu-conv=disable
- VVX 350: http://downloads.polycom.com/voice/software/UC_Software_6_4_5_release_sig_split/3111-48830-001.sip.ld,bgu-conv=disable
- VVX 450: http://downloads.polycom.com/voice/software/UC_Software_6_4_5_release_sig_split/3111-48840-001.sip.ld,bgu-conv=disable
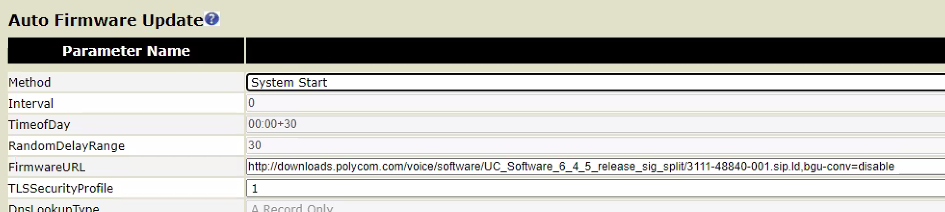
- Navigate to System Management > Auto Provisioning > Auto Firmware Update
- Set the following fields:
- Method: System Start
- Firmware URL: The downloads.polycom.com link you selected above in Step 5
- At the bottom click Save
- In the top right of the screen, click Reboot
- Give the phone 5-10 minutes to do multiple reboots.
If you are presented with a screen that asks to change the admin password, that means it has successfully converted back. You just need to make sure you follow Provisioning Polycom Phones to get it added to the phone system.
If the device instead stops at the networking screen, you may need to apply a static IP address to get it to reconnect to your network.
In the event any other screen appears, the device may have been improperly flashed or may be inoperable. Refer to manufacturer documentation for potential solutions.