v20
What is an Inbound Rule?
Inbound Rules define how a call flows into the system as the first step after receiving the call.
A list of Inbound Rules can still be found in v20 under Call Flow > Inbound Rules, however numbers are assigned directly to the resource that will use them.
Assign or Remove a DID

- Edit an Extension, Department, Ring Group, Call Queue, or IVR in the system
- At the bottom of the page, search for and click on your free DID that you want to assign.
- If you want to remove it, simply click it on the left under the Assigned DIDs list.
What happened out of office or split routing?
In v20, this has been replaced by the concept of directly assigned DIDs to IVRs and departments. If you want a number to follow a specific business hours route, you can either:
- Follow Creating Extension Departments/Groups to create a department that handles the hours and routing of many numbers that perform the same tasks
- Or point at an IVR, and that has it's own “Out of Office” routing that follows the Department hours. This allows different numbers to have different out of office routes, but sharing the same business hours.
v18
Inbound Rules are how the phone system dictates where a call will be directed for a set phone number (DID). These phone numbers must be setup when the SIP trunk is added to the system.
To ensure a smooth process of adding inbound rules, we recommend that the following destinations have been setup:
Setting up an Inbound Rule
- Log into the bvoip phone system.
- Click on the Call Flow drop-down menu.
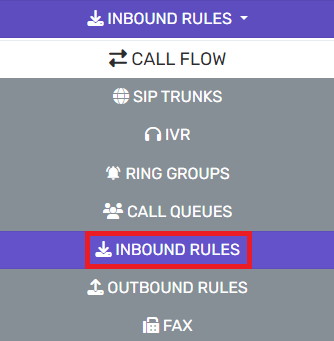
- Go to the Inbound Rules subsection.
- Click on the Add DID button to add each DID number. The page will refresh.

- Scroll to the Trunk Details section.
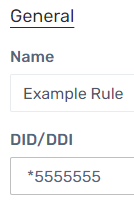
- In the Name field, list a name to differentiate it from other DIDs.
- In the DID/DDI field, select the desired DID from the drop-down.
- Go to the Route Calls To section.
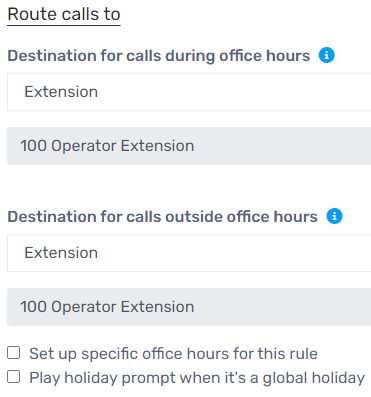
- Select the Destination For Calls During Office Hours by clicking on the two drop-downs beneath it.
- Select the Destination For Calls Outside Office Hours by clicking on the two drop-downs beneath it.
- Select the Setup Specific Office Hours for this Rule if the phone number tied to this inbound rule will have different office hours that the other inbound rules. If this option is selected, the section to have the hours configured will appear.
- Select the Redirect calls to HOL IVR when it's a system holiday option if the inbound rule needs to respect the global holidays set in the system. For a guide on this, please see our article on Setting Holiday Hours Functionality.
- Click on the Save button. Repeat the above steps for each inbound rule.
Setting Up Call Routing by Time Zone
For instructions on how to arrange call routing by timeframe, please refer to our Call Routing by Time article.