Manual Provisioning Notice
Grandstream phones can only be manually provisioned. Zero Touch Provisioning is not available with these devices.
Device Use Warning
Due to the temperamental nature of these phones, bvoip does not recommend provisioning these phones with our system.
Pre-Provisioning Checkpoint
In order to manually provision a Grandstream phone, it must be factory reset and the phone template will need to be set in the bvoip phone system.
For information on how to complete these tasks, please see below.
Provisioning the Phone Template
v20
Setting up the Phone Template
Video Walkthrough

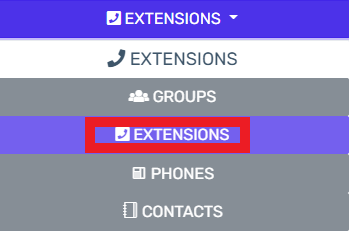
- Login to the bvoip phone system.
- Go to the Extensions > Extensions menu.
- Click on the Edit button next to the extension that the device is being added to, or create an extension.
- Go to the Provisioning > Deskphones tab.
- Click on the Add New Phone Device button. A pop-up will appear.
- Select the desired device manufacturer and model.
- Add the MAC Address without colon into the MAC Address field.
- Click the Save button. The pop-up for the provisioning will close and the page will refresh with new sections being shown.
- Depending on your provisioning method:
- Zero Touch: In the same menu, set MPP Enabled to Yes to enable zero touch provisioning.
- Manual/DHCP: Copy the Provisioning Link from the page, that should be plugged into the phone
- Click the Save button to save the phone template to the extension.
v18
Provisioning the Phone Template
- Login to the bvoip phone system.
- Go to the Extensions > Extensions menu.
- Click on the Edit button next to the extension that the device is being applied to. Click the Add button to create an extension that the device will be applied to.
- Go to the Phone Provisioning tab.

- Click on the Add New Phone Device button. A pop-up will appear.

- Select the desired device model in the Templates drop-down. This should be your specific phone model.
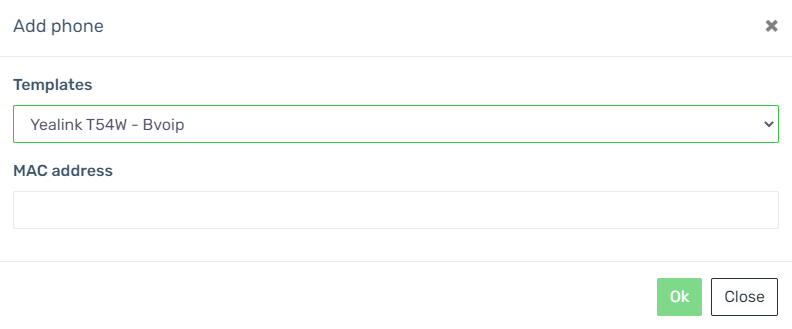
- Add the MAC Address without colon into the MAC Address field.
- Click the Save button. The pop-up for the provisioning will close and the page will refresh with new sections being shown.
- Click the Save button to save the phone template to the extension.
Accessing the Grandstream GUI
To access the web interface, you will need to retrieve the device's local IP and paste it into a web browser. The username and password should both be Admin to access the web interface.
Manually Provisioning a Grandstream Phone
- Enter the Maintenance section.
- Go to the Upgrade and Provisioning section.
- Go to the Config section.
- On the Config Upgrade via subsection, select the HTTP option.
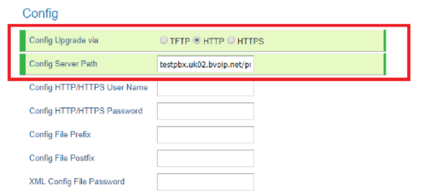
- In the Config Server Path field, ensure that the Device Provisioning URL is listed. You retrieve this from the Provisioning Link field of the Phone provisioning tab in the extension.
- This would be something like: http://<company name>.bvoip.net/provisioning/<random key>/<MAC Address>
- Click on the Save and Apply button.
- Reboot the phone.
The phone will then reboot twice, once for a firmware check and the second to complete the provisioning process. After the reboot, the phone will be setup fully so that not just calls can be setup, but also BLF keys will function as assigned in the phone system.
Phone Still Not Provisioned?
If the phone has not provisioned with either sets of instructions, please refer to our Phone Provisioning Troubleshoot Guide.