Manual Provisioning Notice
Manually provisioning a phone should only be done if the device model is incompatible with the Managed Provisioning Portal. If there is question about whether or not the desired phone is able to be provisioned with the MPP Integration, please contact our support team.
Manual provisioning of the phone should not be required if you have successfully provisioned the phone using the Provisioning Snom Phones article.
Pre-Provisioning Checkpoint
In order to manually provision a phone that is not compatible with the MPP Integration, it must be factory reset and the phone template will need to be set in the bvoip phone system.
For information on how to complete these tasks, please see the articles below.
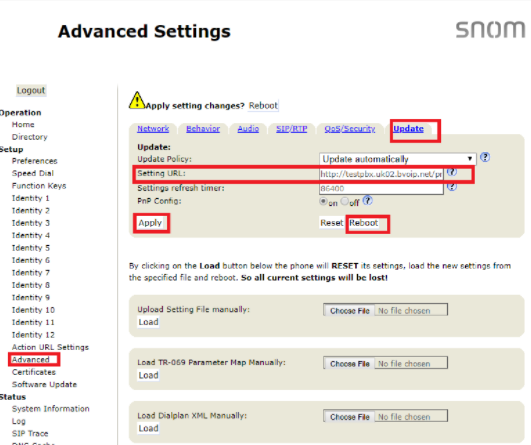
Manually Provisioning Snom Phones
- Go to the Setup Menu.
- Select the Advanced section.
- Go to the Update tab.
- In the Setting URL field enter the Provisioning Link you received from the extension.
- Click the Apply button.
- Click the Reboot button.
The phone will then reboot twice, once for a firmware check and the second to complete the provisioning process. After the reboot, the phone will be setup fully so that not just calls can be setup, but also BLF keys will function as assigned in the phone system.
Phone Still Not Provisioned?
You may need to factory reset the device prior to executing these steps if the previous system set certain configuration options, see our article Factory Resetting Snom Phones for details on how to do so.
If the phone has not provisioned with either sets of instructions, please refer to our Phone Provisioning Troubleshoot Guide.