1stream View Required
1stream View Required
This feature is available for only 1stream View licensed users and higher plans. If you don't have this and would like this feature to be available, please reach out to your Sales Representative to upgrade user licensing.
Integration Setup in 1stream
User Warning
The person setting up the integration must be logged into the same 1stream email account that correlates with the Keap account being connected.
- Log into the 1stream Admin Portal.
- Go to the Administration > Manage Organization menu in the top right.

- Scroll down to the Connected Account and CRM Settings section.
- Click on the green circled + sign. The Add New CRM pop-up will appear.
- In the CRM Platform drop-down, select InfusionSoft .

- Click the Save button. The Modify InfusionSoft Connection Settings pop-up will appear.
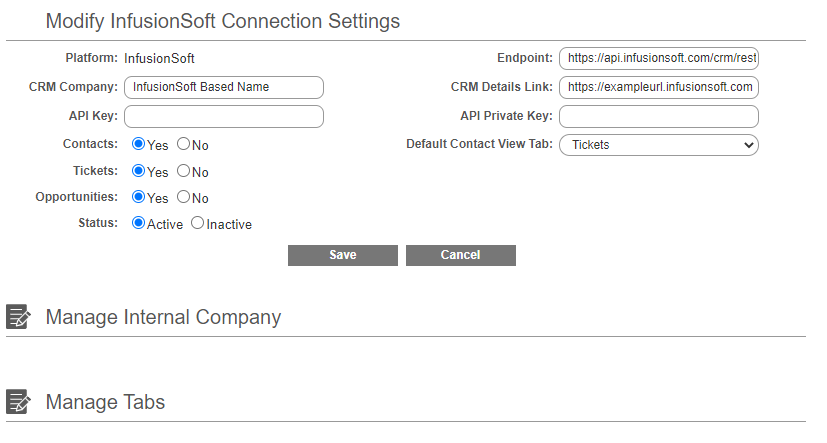
- In the CRM Company field, input the name of your Keap application.
- In the API Key field, input: dGz6wCTygeALpeQSobmLi0qVLyztAZEr
- This is a universal key for bvoip users to use only on Keap integrations with 1stream.
- In the Endpoint field, add the following URL: https://api.keap.com/crm/rest/v1/
- In the CRM Details Link field, add the URL for your Keap application.
- In the Private API Key field, input: xfuGBjsfHs8GjMDT
- This is a universal private key for bvoip users to use only on Keap integrations with 1stream.
- Click on the Save button. The Modify InfusionSoft Connection Settings will close.
- Go the Helper Links column under the CRM Settings section.

- Click on the Allow InfusionSoft Access hyperlinked text. A new browser tab will open and redirect to the Keap login page.
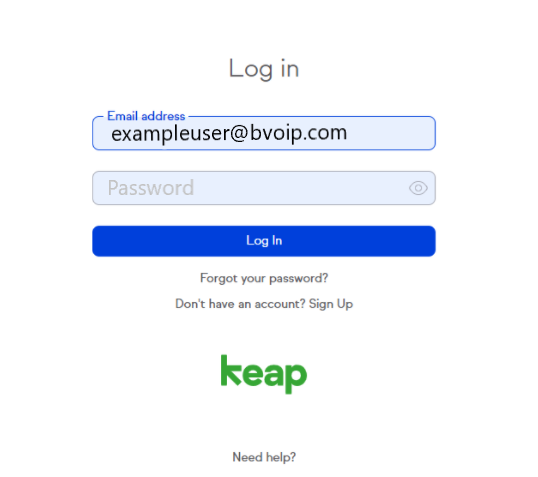
- Log into Keap in the open tab.
- After logging in, the following prompt will appear to permit 1stream access to the Keap application.
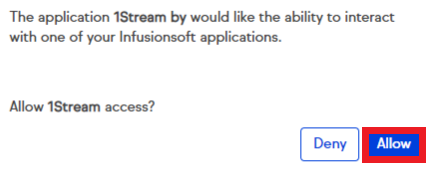
- Click the Allow button.
- Keap will then redirect back to 1stream with the following prompt when the connection is completed.

- Scroll Up to the 1stream Administration section.
- Click on the Systems Check link.
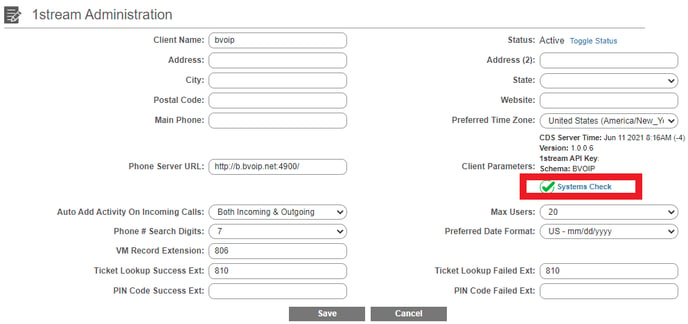
There will be a pop-up that appears and confirms if the connection was successful or if there was an issue that needed to be corrected. This will also pull in the user data from your Keap connection that will be reflected when users are added in the next section.
Didn't Get the 1stream permissions Prompt?
When logging into Keap, if you did not receive the prompt to allow 1stream permissions, but received a view of Your Accounts, this indicates that your session needs to be reset.
To correct this, exit out of the Keap tab and re-attempt Steps 14-19.
Mapping CRM Users
Once the CRM Connection to Keap has been completed, the users in 1stream can be now mapped to their corresponding InfusionSoft user.
For instructions on how this can be done, please see our Mapping CRM Users article.