1stream View Required
1stream View Required
This feature is available for only 1stream View licensed users and higher plans. If you don't have this and would like this feature to be available, please reach out to your Sales Representative to upgrade user licensing.
User not authorized to change isNonBillable
If you are receiving an error about “User not authorized to change isNonBillablevalues for Ticket time entries”, please ensure you have the Service Desk > Time Entry Permissions > Can modify Non-Billable setting on ticket time entries permission enabled for the security role.
Steps to Implementation
Setting Security Roles
- Log into the AutoTask portal.
- Go to the AutoTask menu.
- Select the Admin option.

- Click on the Account Settings & Users section.
- Select Configure Security Levels under Resources/Users (HR).

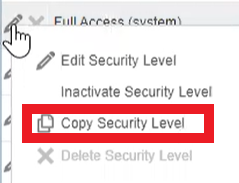
- Right-click to select an existing system level API role.
-
Copy Security Level

- Rename the User to include 1stream for easier identification.
- Go to the Contracts section.
Contracts (Expandable >)

- Go to the CRM section.
CRM
Account & Contact Access

Object Permissions

Other Permissions

- Select No Permission for Inventory and Projects
- Go to the Service Desk section.
Service Desk
Object Permissions

Time Entry Permissions

Other Permissions

- Select No Permission for Documents, Timesheets, and Reports
- Go to the Admin section.
Admin
Feature Access

- Select No Permission for Other
- Go to the Web Services API section.
Web Services API
Feature Access

Resource Impersonation

Contact Impersonation

- Click the Save and Close button.
Adding the API User
- Return to the AutoTask menu.
- Select the Admin option.
- Go to the Account Settings & Users section.
- Select Resources/Users under Resources/Users (HR).

- Click the + New > New API User option.

- Fill out the First, Last and Email columns with whatever you prefer.
- In the Security Level drop-down, select the new API security level.

- Click the Generate Key and Generate Secret buttons.

- Copy the Password provided.
- Go back to the 1stream portal.
- Paste the password into the CRM Password field.
- In the CRM Username field, put the Username (Key).
- Go back to AutoTask.
- Set the Integration Vendor to BvoIP - Telephony in the drop-down.

- Under Line of Business, you can choose a limited list, select all current ones, or leave it blank to allow for all current and future Line of Businesses to be accessible via 1stream.

- Click the Save and Close button.
Connecting AutoTask in 1stream
- Log into the 1stream Portal.
- Go to the Administration > Manage Organization menu.

- Scroll to Connected Account and CRM Settings section.
- Click on the green circled + button.
- A pop-up will appear. Choose AutoTask from drop-down.

- Click the Save button.
- CRM Connection Settings pop-up will appear.
- In the CRM Username field, add the API User email.
- In the CRM Password field, add the API User password.
- In both the Endpoint and the CRM Details Link field, add the AutoTask CRM URL. (e.x. https://ww##.autotask.net)
Note: Do not use a slash at the end of the URL. This must have https:// at the front. - Scroll up to the 1stream Administration section.
- Click on the System Check button. The systems check pop-up will appear, syncing the data between systems.
- Ensure you click the Load Contacts button to ensure the contact sync job is enabled.
Mapping CRM Users
Once the CRM Connection to AutoTask has been completed, the users in 1stream can be now mapped to their corresponding AutoTask user.
For instructions on how this can be done, please see our Mapping CRM Users article.