What is an IVR?
IVR stands for Interactive Voice Response. This feature in the phone system is set up so that you can have an interactive menu for callers to be funneled to their desired destination. The other terms used for this function is an Auto Attendant or Digital Receptionist.
v20
Creating and Editing an IVR
Video Example

- Log into the bvoip phone system.
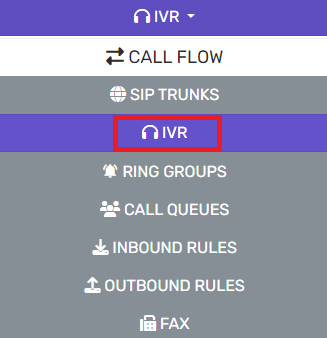
- Click on Call Flow drop-down menu.
- Go to the IVR subsection.
- Click on Add IVR button. The screen will refresh to set up the IVR.
- Enter the details as desired
- Digital receptionist (IVR) Name: The name of the IVR for internal purposes
- Digital receptionist (IVR) Number: The extension number to reach this at
- Audio Prompt: See our Managing Audio File Settings guide for more information.
- Timeout (seconds): How long to give without input before going to the Timeout Destination.
- Group/Department: What group hours/holidays/timezone should this follow
- Go to the Menu Options section.
- For each number, you can select a Menu Option from the drop-down. Some options will have a secondary drop-down appear under the Destination column.
- In the Destination drop-down, either select the desired destination or audio file where applicable.
- Beneath the Menu Options you'll find the special routes
- When office is closed route to… Will trigger outside the Department's defined business hours.
- When on holiday route to… Will trigger when the Department is on holiday
- When on break route to… Will trigger during the Department's break periods.
- Each of these can also be defined to Play Announcement before reaching the next destination, which can be helpful for holiday greetings.
- Click the Save button.
Assign or Remove a DID

- Edit an existing IVR in the system
- At the bottom of the page, search for and click on your Free DID that you want to assign.
- If you want to remove it, simply click it on the left under the Assigned DIDs list.
v18
Configuring the IVR
- Log into the bvoip phone system.
- Click on Call Flow drop-down menu.
- Go to the IVR subsection.
- Click on Add+ button. The screen will refresh to set up the IVR.

- Go to the General section.
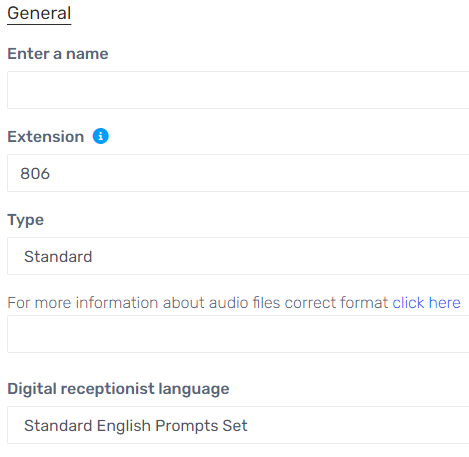
- In the Name textbox, add the desired name such as InOfficeHours or something similar.
- Under Intro Prompt Setting, choose the desired prompt file from the drop-down. If a file is needs to be recorded or uploaded, it can be done using the buttons next to the drop-down.
- Go to the Menu Options section.

- For each key number, select a desired Menu Option from the drop-down if there will be menu options. Some options will have a secondary drop-down appear under the Destination column.
- In the Destination drop-down, either select the desired destination or audio file.
- Scroll down to the Destination For Invalid or No DTMF Input section.
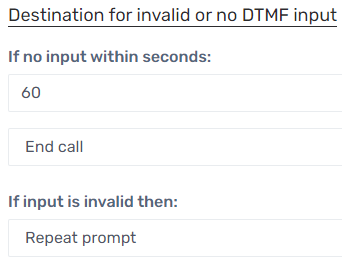
- In the If No Input Within Seconds field, enter the amount time needed before action is taken.
- In the drop-down below the If No Input Within Seconds field, select the action to be taken once the designated time has elapsed.
- In the If Input is Invalid drop-down, select the action to be taken.
- Click the Save button.
Further Action Needed
Once the IVR has been setup, it will be able to be used as a destination for Inbound Rules and nested into other IVRs.